Friday, October 30, 2015

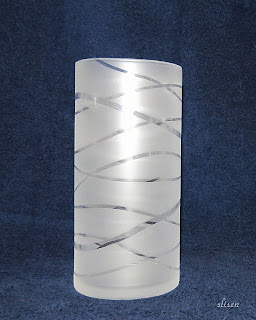
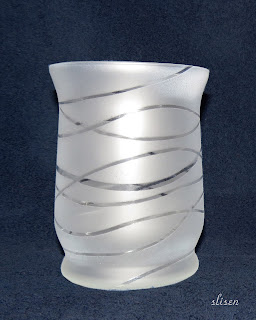
Rubber Band Frosted Vase or Glassware

slisen.blogspot.com
(Click on photos to enlarge)


DISCLAIMER:  However lovely these vases are, the spray frosting paint is NOT permanent.  After drying for 2 days, I was getting these ready to wrap as a gift and notice that there were worn spots and chips in the finish on the bottom where they had been setting on the counter.  So I carefully used my fingernail to 'scratch' a small inconspicuous area and the frosting easily came off.  So my final conclusion is that glassware sprayed with frosting paint will not be a lasting thing of beauty.  I'm so disillusioned.
I just ‘discovered’ another fun thing to do.  A friend posted a video from YouTube on FaceBook that shows how to make frosted designs in glass vases that look for all the world like etched work.  Lovely pieces, a relatively cheap craft and no 2 designs will be the same.  Use your browser’s search engine and search on ‘rubber band vase’.  You’ll see some beautiful pieces of work and also links to videos on YouTube that show you how to do it.  This is the very good video that I watched.   https://www.youtube.com/watch?v=d8wmHG_NTcs
First off, this is a list of needed supplies:
A piece of glassware
An assortment of rubber bands
A spray can of ‘frosting’ paint
The gal in the video I watched used 7” glass cylindrical vases but any shape or size can be used.  But unless you can find some really long rubber and wide bands, I’d stick to around this size.  As rubber bands stretch, they get thinner and you may want some wider bands. 

Wash the glassware in soap and water, then wrap the rubber bands around the vase in whatever design you want.  Make sure the bands are flat and not twisted.  I chose to do swirly, mainly cuz that’s what the video showed and I love them.  The more rubber bands you use, less frosting and more glass will be showing.  Fewer rubber bands will result in more frosting and less glass.  Get creative. 
The video instructed to clean the outside of the vase with rubbing alcohol and a Q-tip.  But I didn’t do that step because I didn’t know how the paint would interact with the alcohol residue.  So I just wiped the open areas with a dry paper towel to get rid of the fingerprints.
Take your project outside, turn the vases upside down and spray them with the frosting paint, following the directions on the can.  The gal in the video used Krylon Frosting but most every spray paint manufacturer has its own version.  I’m using Rust-oleum Frosted Glass and it worked just fine.  DO NOT overspray.  This paint is deceiving because the frosting effect doesn’t happen til after about 10 minutes so I really couldn’t tell if I was getting good coverage or not.  But trust me, three light coats are better than one heavy one….or in my case, 3 heavy ones as on my first try.  This picture shows what happened when I got too much paint on.  The wet paint pooled around the rubber bands and I had globs of paint left when I took the rubber bands off.  Grrr.
Let the paint fully dry for at least a couple hours above 50 deg F and remove the rubber bands and admire your vase.  I’m loving it!
I read the comments below the video and see that she used water pearls and battery operated submersible LED lights along with candles in some of her finished vases.  How very lovely.
Use your imagination and use other glassware, bottles, cups, candle holders, etc, and different colors of spray paint.  I can easily see these in sparkly gold or silver for the holidays or some of the fluorescent paints to accent a fun mod decor.  
A couple words of caution.…instructions on the paint I used said frosted articles could be gently hand washed with soap and water but not to put them in the dishwasher.  And it also states that the ‘frosting’ can be removed from glass with lacquer thinner or acetone.   Aha, a cure for my disaster vase above….strip it and redo it.

A DAY LATER:
I stripped the 'mistake' glass with paint thinner and washed it in lots of soap and water, rinsed well and redid it.  It turned out as nice as the other one.
 

Thursday, October 22, 2015

'Blended' Ribbing

slisen.blogspot.com
(Click on photos to enlarge)


This is a great ribbing technique that will give a ‘blended’ transition into the main fabric and it’ll keep the ribbing from flipping up where it joins the main fabric, like some ribbing can especially on shorter ribbed bands.  Most of the time, the flipping doesn’t irritate me that much but there are times when I want more of an edging rather than the typical ribbed effect with the definite line after the ribbed section.  This has been in my bag of tricks for just ages and I really don’t remember where I picked it up from but it has come in handy from time to time.   I used a 1x1 ribbing for this garment and I haven’t used it with anything other than 1x1 but I can assume that it would be just as attractive in other ribbing configurations too.  Give it a try and do some experimenting.

I didn’t use a tight ribbing on this garment because I wanted the peplum to lay more flat rather than pulling in at the bottom.  The body is knit at T3 on my midgauge machine with this yarn so I knit the ribbing at T0 on both the main bed and ribber bed.  After completing the 10 rows of ribbing, I loosened the tension to T2 on both carriages.  Then I transferred every other stitch from the ribber to the main bed and knit 3 rows for the bottom edge and 2 rows on the sleeve edge.  Then I transferred every other stitch of the remaining stitches on the ribber bed to the main bed and knit 3 (and 2) rows again.  Then I transferred all remaining stitches to the main bed.  I took my tension up to the body tension of 3 and continued with my garment.  It looks and behaves just as nice on tighter ribbing too and doesn't leave the defined separation line and doesn't flip.


Saturday, August 15, 2015

Fix Those Pesky Holes in Shortrowed Heels

slisen.blogspot.com
Those pesky holes on the sides of heel shaping in circular shortrowed machine knit socks are easily fixed on the machine with a couple of simple extra steps.  There are several ways to hide the holes, but this is my all time favorite.  Just a note that I again did not devise this technique but have borrowed it from a seasoned machine sock knitter, 'Ozlorna' on Ravelry.  Check out her post at http://www.ravelry.com/discuss/machine-knitting/1395719/451-475#466
Apparently this 'trick' came from the hand knit version of Japanese short rows.
This is what I call the 'bobby pin' trick.  It is easy to do and looks very nice. 


1)  Before beginning the shortrow decreases, hang a bobby pin on the yarn coming off the main bed and into the carriage.  Snug it up to the first stitch.  You may want to hang a clothes pin from the bobby pin if the magnets in your carriage interfere with its hanging down.


2)  Proceed with your shortrowing as usual…until you get to the last row.  Do NOT knit across the last increase row but hang another bobby pin on the strand of yarn coming off the main bed and into the carriage.  Snug it up to the first needle, put your needles back in working position and knit across to finish the shortrowing.
 
 
3)  After the last row of shortrowing, pick up the bobby pins and hang that stitch onto the first needle of the ribber bed on each side.  Remove bobby pins and raise the ribber back up into working position. 
Resume circular knitting on the side opposite the last heel row knit.


Friday, August 14, 2015

Sock Schematic

slisen.blogspot.com

I have knit a LOT of socks so I don’t really need to use my formal 4 page sock pattern anymore.  So I made up this generic schematic that I use instead.  When I have the foot measurements I need, the yarn and gauge, I print out the schematic, fill in the blanks with the pertinent data, add whatever notes I need or want to and I have the perfect sock pattern for that person.  Then I scan and save the document for future reference for that person.   I knit my circular socks starting with the cuff but this schematic would work for a toe up sock too.  Just cast on at the toe instead of the cuff.


This is how my schematic looks after I've filled in the information for a particular person.


My Shortrowed Heel and Toe for Socks

slisen.blogspot.com
(Click on photos to enlarge)


I’m trying to get caught up with a few things on my blog, which has been woefully neglected the last little while.  Knitters ask about my socks so thought I’d focus on some of my favorite techniques.  The first thing that comes to mind is how I shortrow for the heels and toes.  I know that some don’t like shortrowed heels and toes but I hope those who do will find this helpful. 
Some complain that shortrowed heels/toes are too rounded and not form fitting.  The shortrow standard is to decrease down to 1/3 of the total number of stitches.  For example if I have a total of 36 stitches in the heel/toe, the standard 1/3 calculation would tell you to leave 12 sts in the center with 12 sts on each side during the decreasing.  This is merely a guideline and doesn’t have to be etched in stone.  If I’m knitting for a narrower heel or toe, I generally decrease down 2 more stitches than the 1/3 calculation.  For example, I’ll shortrow down to 10 sts, leaving 13 sts on each side.  By the same token, if I’m knitting for a squattier heel/toe, I’ll shortrow down to only 14 sts with 11 sts on each side.  Shortrowing can be as form fitting as you want with these simple adjustments, just remember to have the same number of stitches in the sections on both side of the center stitches. 
I like this method of shortrowing because it gives a firmer ‘seam’ line than the standard shortrow method and it does a nice automatic wrap of that first needle to prevent pesky holes along the seam line.  I certainly didn’t ‘invent’ this method but I’ve been using it for just forever.
My pictures show a sock knit in the round but this shortrow method works equally well with a flat sock.  If knitting circularly and your heel/toe is to be formed on the main bed, make sure that the last row knitted is on the main bed so that the yarn is coming off the main bed.
1.  To decrease, lower the ribber one notch, change to main carriage arm and put on hold, hang weights on front of work, at carriage side pull 1 ndl into hold position for automatic wrap and knit across. Hang weights as needed on the main bed work.
2.  Continue til there are desired number of sts in working position. (The general standard is that 1/3 sts remain in work, however this is not necessary. Stay as close as you can to 1/3, but it is important that you have the same number of sts in hold on each side before beginning the increase work).
3.  When you have the desired number of needles in work and the needle closest to the carriage pulled to hold position AND the same number of sts in hold on each side, do NOT knit across…immediately increase back out by putting 2 ndls opposite the carriage back into working position and then knit across.
4.  On subsequent rows, pull one needle at beg of each row on the carriage side into hold position AND two needles opposite the carriage into working position each row til all needles except a set of two needles on each side are again in working position.
5.  When increased back out to one group of sts left on each side, put both sets back into work at the same time.  Unwrap the first needle on the carriage side and knit across.
6.  There are several finishing techniques to prevent holes from forming on the sides of shortrowing but I’ll discuss my favorites in another post.


This photo shows a toe from the top side as it would appear on the foot.  Again the pointiness can be altered by adjusting the number of stitches left in the center during the decreasing process of shortrowing.


Thursday, July 30, 2015

New Baby Birds


slisen.blogspot.com

This has nothing to do with knitting but is fun nonetheless.  This morning a flock of turkeys, mom and about 13 babies as near as I can tell, walked across our front yard.  Wild turkeys are pretty common around here now. 
(Click on photos to enlarge)

And we have 3 new baby robins to welcome to our world.  The nest is right under an overhang on top of our dog kennel so it was easy to grab a couple quick pictures.  I had intended to get a picture of the eggs but guess I was a day late.
1 Day Old

 
6 Days Old
8 Days Old
12 Days Old


Friday, June 26, 2015

DIY Transfer Tools for MidGauge and Bulky Machines

slisen.blogspot.com


Here’s another DIY project that lets me have more than a 3 prong transfer tool for my knitting machines.  With these tools, simply made with a piece of wooden molding or a ruler and some hair bobby pins and hot glue, I’m able to transfer multiple stitches the same as with a garter bar but much easier to handle and maneuver.  They are particularly useful when evenly decreasing the top of a stocking cap. 

I’ve made several lengths to be more adaptable to whatever I’m knitting.  I began with one the same length as the needle pusher and then made several sizes smaller.  You can make whatever length you desire, depending on your needs.  I made a set for each of my midgauge and bulky machines.  The bobby pins are too wide to go thru the gate pegs of the standard machine so I’m afraid that these are strictly for the midgauge and bulky machines.   

The every other needle tool is indispensable when I make my favorite crossed stitch hat band, especially nice for chemo caps, as seen in this project.


So here’s how I made the tools:   


1) With your favorite cutting or snipping tool, cut the rubber tips off the bobby pins. You don’t need to be real precise, just so the rubber tips are cut off. Then spring the bobby pins open just a little bit so the two sides lay parallel to each other and will be about the same distance apart when you hang them on your needles.

2) Open the latches on desired number of needles and hang the bobby pins, facing the same direction, on knitting machine needles. Push the needles back toward the bed just far enough that the bobby pins lay even and flat against the needle bed.

3) Place a wooden ruler or piece of wood molding in back of the bobby pins, with the flat side against the bobby pins.

4) Use little clamps to hold the end bobby pins onto the wooden strip. Make sure all the needles are hanging straight and the wooden strip is hanging even. Leave ¾ to 1” of the bobby pin sticking above the wooden strip.

5) With a hot glue gun, run a bead of glue over the middle bobby pins that aren’t under the clamp. Do not move until set. Remove the end clamps and run a bead of glue over the end bobby pins. Again, make sure they are straight and laying even.

6) When the bead of glue is dried and pins are secure, remove the strip from your machine and finish gluing the pins. Keep the glue about ¼” from the edge of the wooden strip. Cover the ends of the rest of the pins with glue making sure that glue gets in all the nooks and crannies.  The backside doesn't look the prettiest but gets the job done.

7) When the glue is thoroughly dried and set, cut the wooden strip so that only about ¼” goes past the end bobby pins. Don’t want to leave it too long otherwise it will bump into the other needles on your machine when you’re transferring stitches.

Friday, March 20, 2015

Tapered Leg Warmer


slisen.blogspot.com

 I got desperate this winter and worked up a couple pairs of tapered leg warmers with superwash wool sock yarn on my standard gauge machine with ribber.  The other straight ones I made (in a previous post) were fine but they did slouch a bit and I wanted them to stay up and cover as much skin as possible.  Don’t know about you but my legs aren’t straight up and down so I devised a tapered version to better fit my leg contours merely by adjusting tension from tighter tension at the ankle to looser at the knee.  And as luck would have it, I had just received the Lycra that I ordered and added it to the top few rows.  Works great and kept my legs toasty through the awful cold of winter just fine.  Here’s what I did.  You can adjust number of cast on stitches or tensions that will best fit your leg.  One 100 gram skein of sock yarn will make a pair of warmers.
P.S.  Do you know how hard it is to take a picture of your own legs???


My Adventures with Lycra (Spandex)

slisen.blogspot.com 
I’ve been contemplating purchasing a cone of Lycra to run a strand in the ribbing of my socks for quite a while but guess I didn’t want to part with the bucks for a whole cone.  It’s not real cheap and has many, many, many yards that I’d have to leave in my will.  Then there was a discussion about it on Ravelry and I knew I had to have some.  It came, I knit and I love it….should’ve gotten it years ago.  
(Click on photos to enlarge)
There’re a few ‘rules’ that need to be followed when using Lycra but they’re not show stoppers.  First off, it’s cobweb weight, 84,000 yds per 2.2 lb cone.  So a bit of patience is involved, mostly to keep it from getting tangled up and/or breaking.  I had a few hair pulling minutes when I lost the end and couldn’t find it again….that’s when the patience kicked in.   I ran the strand of Lycra through my yarn mast and spring but not through the tensioner.  It needs to be free flowing with very little tension.  Once knitting begins, everything went well.  
I found that loosening the tension dial by a full number higher than my main tension while adding the Lycra works the best and gives a nice hugging ribbing.  For example, if I use T5 in the main body of my sock, I'll use T6 in the section of ribbing where I added the Lycra.  Adjust tension to your liking.   And it doesn’t need to be added in the full length of the ribbed cuff.   I ran it in the full length in my first pair of socks but in the legwarmers I made, I only ran it in the top 30-35 rows or so and they stay up just fine.
After knitting is completed, Lycra must be heat set to activate its elasticity.  I used my steam iron and steamed the area heavily.  Another probably easier way is to run them thru the dryer on low heat after laundering but make sure to use superwash wool if you intend to put them in the dryer.  I use superwash wool sock yarn so I can’t say what steaming would do to acrylic sock yarns but I’d be quite hesitant to steam acrylic yarns for fear of killing the yarn.  I definitely would launder as usual and run them thru the dryer.  Just another note that fabric knitted with Lycra will shrink up a bit lengthwise but I didn’t notice any appreciable shrinkage widthwise.
I ordered the Lycra from http://theknittree.com/store/spandex-stabilizer-lycra-trademark-dupont-invista.  I also ordered the booklet with patterns and tips on using the Lycra.  I picked up lots of tips but the patterns are written for a Passap machine.  I’m not promoting this business or this specific product and I’m sure there are other places to purchase it.  A seller on ebay has several weights of Lycra listed now but are heavier than the cone I got from theknittree.  I don’t think I’d want it any heavier.  This is a nice weight for socks and I’m sure would work just fine in garments too.
So there’s my take on using Lycra in the knitting machine.  I like it!

Saturday, January 10, 2015

Leg or Arm Warmers

(Click on photos to enlarge)
slisen.blogspot.com

We’ve been experiencing several Arctic blasts this winter and I’m cold!!  I normally don’t mind hibernating thru this time of year but we haven’t been so lucky this year to be able to stay in when we want to.  Sometimes there just aren’t enough clothes to keep a body warm but I happened to think of some leg warmers that I made a few years ago for others and seemed to remember that I had one pair left in my cupboard that just needed seaming up.  So I quickly seamed them and am a believer!  Oh my, no cold bodied person should be without them during the winter time in the upper Midwest.  I ran thru my stash and found enough yarn to make another pair so now I have 2 pairs.  I most undoubtedly will make another pair but these 2 pairs will atleast give me a pair to wear while one is in the laundry.  

I used my g-carriage for the pairs I made previously, probably because I was busy with other things and the g-carriage can run while I’m doing other fun stuff.  But this year, I used my KH965i and ribber and I think I like them better.  Ribbing with the g-carriage doesn’t seem to retain its memory like a machine and ribber but that may be just a matter of adjusting to a tighter gauge with the g-carriage.


(One each warmer from 2 pairs, slouched)
I used superwash wool sock yarns, except for a couple pairs that I made with acrylic sock yarn for my sister who is allergic to wool.  They are so simple and easy to make, just a rectangle knit to desired length and seamed up.  They can be adjusted for size by adding or subtracting stitches and rows.  They can be worn slouched or pulled up to knee for maximum coverage.  One 100 gram skein of sock yarn will make a pair but I found that by adding more length, the top can be rolled down to make a cuff and they are extra toasty and seem to stay in place better. 

Gauge will vary with yarns as not all sock yarns are created equal.  As with socks, sock yarn will stretch with wear so be mindful of this when you chose your tension.  The warmers are best if they fit snugly but not tight.  If you want your warmers to slouch, use a loose gauge.  A tight fabric will not be as warm as a looser knit fabric, so do some experimenting with the yarn you’re using.

So here’s my take on easy, peasy leg warmers.

Machine:  Standard gauge machine with g-carriage or ribber
Yarn:  Any superwash wool/nylon mix or sock yarn of choice
Tension:  6 to 7, depending on yarn and size
Size:  Will fit woman’s medium and will be about 16” unstretched
               (Add or subtract stitches and rows depending on size desired)

Start with dividing a 100 gram skein in half.  A postal scale is invaluable for weighing ounces.


(Made with acrylic sock yarns)
1.  CO 90 sts, with closed CO of choice.  (With the g-carriage I like to use a double needle e-wrap.  With the ribber, I like to e-wrap CO the main bed, knit 1 row across, then transfer stitches to the ribber bed in desired ribbing pattern, hang CO comb and knit away.  I prefer 1x1, 1x2 or 2x2 ribbing.)

2.  Knit in ribbing for atleast 170 rows, more if you want foldover cuffs and if you have enough yarn.

3.  Loosely bind off.  I like to end with the carriage on the left and do a back stitch bind off, which will give a nice flexible BO.

4.  Seam with mattress stitch or I prefer to use a Bickford seam, which gives a nice flat seam and makes the legwarmers pretty much reversible.

Think outside the box and make arm warmers using the same theory as for the leg warmers; knit a ribbed rectangle in width and length as needed for size.  Leave an opening in the seam a couple inches below the edge for the thumb to fit through.