Thursday, December 26, 2013

Striped Ribbed Scarf

slisen.blogspot.com
(Click on photos to enlarge)

This scarf concept has been around for just ages and I’ve been wanting to work it up for just about as long.  I made a couple this fall and really, really like them.  They’re warm, cushy, reversible and don’t require any treatment whatsoever for those pesky curling edges.  They’re done when they come off the machine.  What could be better than that?  I used a couple skeins of worsted roving type yarns in these on my midgauge machine with ribber, but they could certainly be made on any machine with any yarn with the right gauges.  Pair them up with some felted mittens or fingerless mitts and you’ll have a nice set for gifting…just be sure to make yourself a set.

Machine:  SK-860 midgauge with ribber
Yarn:  Universal Classic Shades, 1 skein each of 2 contrasting colors
Size:  5.5” wide, 6’ long
Gauge:  4 sts, 5 rows = 1” in 1x1 rib
Tension:  5+ on both MB and RB

1)   e-wrap CO 44 sts on main bed, K1R  (COL),
2)   Transfer EOS to ribber for 1x1 rib.  Hang CO comb and weights,
3)   K2R in main color,
4)   K2R in contrasting color,
5)   K354R changing yarn colors after every 2 rows or til yarn is gone, ending with
      COL,
6)   Transfer ribbers sts to main bed,
7)   Backstitch BO.


Ribbed Knee Socks

(Click on photo to enlarge)
slisen.blogspot.com

On the Christmas list for one of our granddaughters was a pair of neutral colored knee socks.  I usually have sock yarn on hand so I went stash hunting and came up with the perfect natural colored yarn.  So on to the pattern.  I’d never made a pair of knee socks before this and I spent a few days thinking out my plan of attack for the ribbing up to the knee to compensate for the larger-than-ankle calf.  And not having her here to measure, I was kind of taking a shot in the dark on size.  My shot worked out well and they fit!  I love it when one of my brain children work out well.  I must admit though that my decreasing in the ribbing needs to be improved to give better looking decreases, hence a better looking seam line.  I’ll take time later to work that out but she really liked the resulting socks, even with the bad decreases.
Machine:  Brother KH965i with ribber
Yarn:  Cascade Heritage Sock Yarn, 2 skeins
Gauge:  T5 in body for 9 sts, 11 rows per inch
Size:  9.5” foot
CUFF:
1)  CO 76 sts, with e-wrap CO, K1R to L and transfer sts to ribber in 2x2 ribbing.
2)   Hang CO comb and weights.
3)   T7, K114R in 2x2 rib.
4)   T6, dec one st each side, K12R.
5)   T5, dec one st each side, K12R.
6)   T4++, dec one st each side, K12R.
7)   T4, dec one st each side, K12R.
8)   Knit in rib at T4 to RC186 and decreasing the same as above, until 64 sts remain.
9)   For the ribbing seam up the back, transfer all mb sts to the ribber, K1R at T5.
ANKLE:
1)  T5, move the outer 16 sts on each side to the main bed and K21R in circular.
HEEL:
1)  T5 and with one strand of Woolly Nylon shortrow down to 10 sts and back out.
FOOT:
1)   T5, return to circular knitting and K116R.
TOE:
1)   Repeat as for heel.
FINISHING:
1)  From wrong side, sew ribbing seam with one of the Bickford style seam.
2)   Kitchener stitch the toe seam from the purl side.


Tuesday, November 26, 2013

Striped Blanket


(Click on photos to enlarge)
slisen.blogspot.com

Here is another masterpiece from our granddaughter, the rising machine knitting star.  She wanted to make a blanket for her little brother’s first birthday but didn’t want panels that needed seaming as in her very first afghan.  So again Gramma came to the rescue.  I have an extra KX350 midgauge plastic machine so we decided to put two beds together to make a wider knitting span.  It’s very easy to join the beds together but my only problem was where and how to mount it.  Neither the bar counter in my kitchen nor the dining table are long enough for this double sized machine.  But DH found an 8’ long by about 12” wide piece of 3/8” plywood that it fit on nicely.  I put the leaves in the dining room table, mounted the machine to the plywood, then mounted the plywood to the table.  I put a couple little pieces of thin cardboard under the clamps of the machine so it wouldn’t mar my table.  And all went well.  My kitchen was in a state of disarray for a few days but it was worth it.  Her blanket is gorgeous, little brother loves it and she got lots of rave reviews at the birthday party. 


I especially like how the borders worked out.  The beginning edge is a hung hem and the ending edge is folded over and tacked down to the back side to form the end borders.  The side borders are attached by Sew As Ya Go (SAYG) and then folded over and tacked down to the back side.

Here’s how we did it.


Machine:  KX350 7mm midgauge, 2 beds joined together
Yarn:  I Love This Yarn Sport, 2.5 oz  (230 yds)
               Black, 1.5 skeins
               Bright Blue, 1.2 skeins
               Red, 2.8 skeins
               Sun Yellow, 1 skein
               Plus 1 skein of each color for the borders
Gauge:  T2, 6 sts and 9 rows = 1”
Size:  Approx 39" x 42" without borders

1)   CO 234 needles with waste yarn and ravel cord. 
2)   T2, RC000, K36R with border color.
3)   To form a hem, pick up the stitches from the first body row and hang on corresponding needles in work.
4)   T3, K1R across.
5)   T2, RC000, knit a total of 374 rows changing colors as desired.
6)   RC000, K36R with border color. 
7)   End with COL and back stitch bind off.
8)   When blanket body is complete, fold the border of last end in half toward the back side and whip stitch to the body. 

SIDE BORDERS:  (Sew As Ya Go, SAYG)
1)   Bring out 25 needles.
2)   T2, CO with waste yarn and ravel cord.  End with COR.
3)   Hold the blanket with the wrong side facing and starting at the bottom right hand corner, *on the side away from the carriage, pick up and hang the first loop stitch of the blanket onto the left edge needle of the border. 
4)   Knit 2 rows.**
5)   Repeat from * to ** for the full length of the blanket edge.
6)   Scrap off with several rows of waste yarn.
7)   Repeat for other side.

FINISHING:
1)   Fold the side border in half lengthwise and seam each end by grafting from the purl side.  Remove scrap yarn. Then whip stitch the border to the back side of the blanket, covering the seam line and yarn tails at the color changes.  Seam the edge of the side border to the end border with mattress stitch.
2)   Weave in all yarn ends.
3)   Gently launder and only partially dry in the dryer.  Then block and lightly steam if necessary.  The hems and wide borders keep curling to a minimum.


This is the schematic for the striped patterning we used, designed and implemented totally by our granddaughter.  This was such a fun project.


Saturday, October 26, 2013

Plating...Who Knew?

(Click on photos to enlarge)
slisen.blogspot.com 

Have you used the plating capabilities of your Brother standard knitting machine for plain stockinet stitch?  If so, you've seen that if you’re using 2 colors of yarn that the front of the fabric will be one color and the back will be the other color.  At our last knit meeting, one of the gals showed some of our favorite tuck dishcloths that she’d made by plating the yarns.  When not plating the yarns, our tuck dishcloths develop randomly placed stripes in the fabric.  Her plated dishcloths were nice solid colors and didn’t show the random stripes that we usually get with not plating.  Granted both colors showed through on each side but there were no signs of unpredictable striping.

I’ve never done plating before so thought I’d give it a shot.  It’s very easy to set the machine up for plating.  Follow your machine user’s manual to replace the regular yarn feeder assembly in the main carriage sinker plate assembly with the plating yarn feeder assembly that came with your machine.  Take out 2 screws, remove the old assembly, insert the plating yarn feeder and replace the screws.  Easy. 
2 color tuck dishcloth with no plating


I found that threading and unthreading the darned thing is a bit awkward however.  I’m sure that’ll get easier with practice.  And there’s no little latch to close to hold the front yarn in place and I had 2 instances where the front yarn hopped out of the feeder.  It was my own fault though.  I was wearing long, floppy sleeves when I reached across the feeder to change tensions and I must’ve brushed up against the yarn and dislodged it.  I just need to be more aware and careful.  Everything went just fine after that.  While threading the feeder, make sure that the yarns aren’t twisted and that both yarns are properly seated as it shows in the manual.

NOTE:  Check out a comment I received from Aminetta below.  She very thoughtfully suggested that threading the plating yarn thru the spring wire on the upper mast of a Brother machine would hold the plating yarn back so that it doesn't pop out of the feeder slot.  Thank you Aminetta.


Also, placement of the yarns in the feeder affects how your fabric will look.  The yarn in the front slot will be predominant on the back side of the fabric. The yarn in the back slot will be predominant on the side visible to you while knitting in tuck.

One of the other gals at the meeting said that she uses a thin plating yarn if she’s working with some pesky yarn or when she wants a bit more body to the fabric.  And another said that she used plating when making her baby blankets to give a nicer look.   So there are more applications for plating than just stockinet stitch work.  I think you’ll be pleased with the results of plating if you try it.

Friday, October 18, 2013

A New Machine Knitter

(Click on photos to enlarge)
slisen.blogspot.com

Me telling our granddaughter that she couldn’t ‘confiscate’ a scarf that I’d made for myself and saying that I could make her one later or better yet, I’d teach her how to make her own turned out to be the best thing that I could’ve replied.  She took me up on the offer to make her own and we now have a new machine knitter in this world.  I was sure hoping that one of the girls would become a machine knitter and it was looking like the odds were getting slimmer, but here she is.

I set up my little KX-350 midgauge machine on the kitchen counter for her a couple months ago and it’s still there.  The tuck lace scarf was only the beginning.  Since then, she’s knit a huge paneled blanket (in Dallas Cowboys’ colors, of course), several tuck dishcloths and lastly mittens.  She’s been pilfering through my stash, which also turns out to be a good thing.  And she’s got all kinds of plans for Christmas knitting this year.

Yay for her, I’m so proud of her!

Several years ago, I gifted my KX-350 to our other daughter-in-law when it looked like she was going to machine knit but then life got too busy for her with kids and working full time.  She has given that machine back to our granddaughter so she even has her own machine now.  (Yes, I did replace my machine that I gave to our daughter-in-law).

Enjoy the pictures and notice the smiles!

Thursday, October 17, 2013

Felted Fingered Mitten

slisen.blogspot.com
(Click on photos to enlarge)

I really like the looks and warmth of mittens but I don’t wear them at all because they’re so clumsy.  I like to be able to use my fingers without having to take a mitten off.  So I got to thinking and looking around and thought that I could easily use my felted mitten pattern to add a finger just as I did the thumb.  One finger is better than none at all when it’s really cold.

My felted mitten pattern features a shortrowed fingertip but only one side of the fingertip is shaped on this mitten so I used decreases in the center of the mitten to get the shaping I needed.  It’s not hard at all but does take a bit more time than shortrowing.  These too can easily be made in the round on a machine with ribber.


So, here’s my take on a fingered mitten.  They look kind of strange but they work for me.


FELTED FINGERED MITTEN

Size:  Woman’s Medium
Machine:  KX-350 midgauge
Yarn:  Interlacement’s Sweet Feet sock yarn (2 strands), 4 oz
           (400 yds = 4 oz)
Gauge:  Pre-Felt 5 sts, 6 rows = 1”

CUFF:
1)   CO 42 sts with waste yarn and ravel cord.
2)   With main yarn, e-wrap each needle by pulling the e-wrap thru the stitch already
       on the needle created by the ravel cord.
3)   RC000, T6, K6R.
4)   Work 2x1 rib with latch tool, beginning with the 2nd stitch.

WRIST:
1)   RC000, T7,  K20R (or desired length). 

THUMB GUSSET:
1)   RC000, T8, with 2 prong transfer tool, increase 9 sts on each side by increasing 1
      st on beginning of every row 18 times for a total of 18 added sts.  Fill in the empty
      needle with the heel of the previous stitch from the main body.  Knit across so
      COR. 

2)   Opposite the carriage, scrap off 8 sts with several rows of waste yarn.
3)   K1R, opposite the carriage, scrap off 8 sts with several rows of waste yarn.

HAND:
1)   RC000, T8, K17R on 44 sts.
2)   For finger, opposite the carriage, scrap off 7 sts with several rows of waste yarn.
3)   K1R, opposite the carriage, scrap off 7 sts with several rows of waste yarn.
4)   Continue to knit on 30 sts until RC026, COL.

FINGERTIP SHAPING:
1)   RC000, decrease one st on needle L1 and move all stitches on carriage side in to
      fill the empty needle, K1R.
2)   Decrease one st on needle R1 and move stitches on carriage side in to fill the
      empty needle.  K1R.
3)   Continue decreasing one stitch in the middle on alternating sides, move stitches in
       to fill the empty needle and K1R, until 20 sts remain, RC010.
4)   With 2 prong transfer tool, decrease one stitch on each side, along with the one in
       the middle, K1R.
5)    Repeat step 4.  (14 sts remain)
6)    Scrap off with several rows of waste yarn.

FINGER:
1)  With wrong side facing and finger pieces in the middle of work, hang a total of 16
      stitches with the 7 sts from the left finger section, 1 stitch from that edge of the
      mitten body, 1 stitch from the edge of the right hand mitten body and 7 sts from the
      right finger section.
2)   RC000, K14R.
3)   With 1 prong transfer tool, transfer EOS to its neighbor to the right and move
      stitches together.
4)   K2R.
5)   Dec EOS as above, move stitches together.
6)   K1R and gather.

THUMB:
1)   With wrong side facing and thumbs in the middle of work, hang a total of 18 stitches with the 8

       stitches from the left thumb section, 1 stitch from that edge of the mitten body, 1 stitch from
       the edge of the right hand mitten body and 8 stitches from the right thumb section.
2)   RC000, K2R.
3)   With 2 prong transfer tool, dec 1 st on each edge.
4)   K12R even.
5)   With 1 prong transfer tool, transfer EOS to its neighbor to the right and move stitches together.
6)   K2R.
7)   Dec EOS as above, move stitches together.
8)   K1R, gather and secure.

FINISHING:
1)   Vigorously stretch fabric lengthwise to set stitches.
2)   Loosely graft the fingertip together from purl side.
3)   From the public side, loosely sew all seams with Bickford style stitching.
4)   Felt to desired size.


Saturday, October 5, 2013

Felted Mittens

(Click on photos to enlarge)
slisen.blogspot.com

I’ve been machine knitting for many years but I've never made a pair of felted mittens.  I’ve been wondering what I could make with some worsted wool that I’ve had on hand for awhile, so guess it’s about time for some felted mittens.  They’re based on my favorite mitten pattern with size adjusted to compensate for the felting.  They feature a thumb gusset for better fit and a shortrowed fingertip.
One 4 oz skein will make the size in this pattern.  But they’ll take a bit more yarn if you need a bigger size or want longer wrists and cuffs.  To save on main color yarn, a contrasting color could be used for stripes or a contrasting cuff/wrist.   These are a basic mitten but could be dressed up with colorful yarns, fairisle or embellished with embroidery, needle felting, adding a braid or woven ribbon, line with a pretty fabric, etc.  Another nice option would be to knit a ribbed cuff in non-felting yarn and sew it to the inside of the mitten wrist.  Use your imagination.

The 2nd pair was made with 2 strands of Sweet Feet by Interlacements Yarns, a non-superwash variegated sock yarn, with a gauge of 5 sts and 6 rows per inch.  (3.7 oz)


Felted Mitten

Size:  Woman’s Medium
Machine:  KX-350 midgauge
Yarn:  Aussi Wool Worsted Weight, 4 oz
Gauge:  Pre-Felt 4 sts, 5.5 rows = 1”

CUFF:
1)   CO 42 sts with waste yarn, knit 6 rows with waste yarn and knit 1 row with ravel cord. 
2)   With main yarn, e-wrap each needle by pulling the e-wrap thru the stitch created by the ravel cord already on the needle.
3)   RC000, T6, K6R.
4)   Hand manipulate 2x1 latched rib, beginning with the 2nd stitch.

WRIST:
1)   RC000, T7,  K16R (or desired length).

THUMB GUSSET:
1)   RC000, T8, with 2 prong transfer tool, increase 9 sts on each side by increasing 1 st on beginning of every row 18 times.  Fill in the empty needle with the heel of the previous stitch from the main body.  (The last inc will be on RC017, then K across to RC018, with COR).
2)   Opposite the carriage, scrap off 8 sts with several rows of waste yarn.
3)   K1R, opposite the carriage, scrap off 8 sts with several rows of waste yarn.

HAND:
1)   RC000, T8, K26R on remaining 44 sts.
2)   Put machine on hold and half the stitches opposite the carriage into hold position.
3)   Shortrow on working needles down to 8 sts and back out.  (Use a simple shortrow, do not wrap needle on the increases).
4)   Cut yarn leaving a tail to be used for seaming.
5)   Scrap off both sections with several rows of waste yarn.

THUMB:
1)  With wrong side facing and thumbs in the middle of work, hang a total of 18 stitches with the 8 sts from the left thumb section, 1 stitch from that edge of the mitten body, 1 stitch from the edge of the right hand mitten body and 8 sts from the right thumb section.
2)   RC000, K2R.
3)   With 2 prong transfer tool, dec 1 st on each edge.
4)   K12R even.
5)   With 1 prong transfer tool, transfer EOS to its neighbor to the right and move stitches together.
6)   K2R.
7)   Dec EOS as above, move stitches together.
8)   K1R and gather.

FINISHING:
1)   Loosely graft the fingertip seam from the purl side.
2)   From the public side, loosely sew all seams with Bickford style stitching.
3)   Felt to size desired.  (Mine took 3 cycles of hot/cold).

NOTES:
1)   Use no knots in felted objects.  Knots will result in lumps that you don’t want.  Simply weave the yarn ends in as you normally would.  The felting process ensures that the yarn ends will not loosen and disengage.
2)   During felting, the fabric will shrink up more in length than width.
3)   Before starting the felting, I place plastic bags inside the mitten and pin in place with small safety pins so the layers won’t felt together.  After each wash/rinse cycle, I examine and reposition the safety pins if they’ve gotten dislodged and hidden in the fabric.  My felting for these mittens took 3 cycles of hot/cold wash/rinse and after the 2nd cycle, I removed the safety pins and plastic bags.
4)   All wool is not created equal and the felting process may vary with water temperatures and length of washing cycles.  So check your felting periodically….there’s no turning back if they get too small.

AFTERTHOUGHT NOTES:
1)   After making several of these mittens, I found that with some yarns the thumb base was a bit tight and needed some stretching while drying.  So I've reworked the instructions for the thumb gusset by adding 2 stitches.  Then when knitting the thumb, I knit 2 rows and then decreased 2 stitches, then knit the rest of the thumb as in my original pattern.  It works out well.
2)   I found it totally unnecessary to place a plastic bag inside the mitten while felting.  The sides do not felt together as I would have suspected.  But you can add the plastic if you're worried that they will.
 

Monday, September 30, 2013

Visit to an Alpaca Farm

(Click on photos to enlarge)
slisen.blogspot.com

We have an alpaca farm nearby and they were holding an open house this past weekend.  I've been wanting to visit for a long time and guess that was the incentive that I needed.  What a fun couple of hours.  And the DH was even glad he went with me. 

There were a couple temporary pens set up in front of their shop with a few alpacas that we could admire.  The owner greeted us and explained a few things about alpacas to us.  She and her husband have been in the alpaca business for about 15 years, breeding, selling, shearing, knitting, the whole gamut.  They don't do their own spinning but send it off to local fiber mills to do the processing.  It was hard to tear myself away from the animals, so beautiful and with faces to fall in love with.  She said that as cute as they look, alpacas aren't cuddlers.  They have personalities much like a cat, enjoy their antics and wait for them to come around for attention.

They had several babies this spring altho they looked almost full sized to me.  It was very windy when we visited and the young ones were kind of skiddish about the unfamiliar sounds and people like us roaming around.


This big boy is one of their award winning herd sires.  He was one that enjoyed being touched and petted.


Here is one of their breeding females and she kept an eagle eye on us the whole time we were there.  Isn't she a sweetie?


These are a pair of youngsters.  The one on the right was born with a recessive gene that gave him blue eyes and left him deaf.  He will never be able to be a breeding sire but is very tame and would make a nice companion to a herd.  The owner said that alpacas aren't loners as they get lonely just like we do, so they try to sell in pairs or to already established herds.


OK, enough of the animals.  So we go inside to the shop and find lots of tempting goodies.  Just look at the socks!  Who can resist a pair of socks?  They are so soft and comfy.  Note the ribbons and awards under their counter.


Look at the gorgeous alpaca items, yarns and roving.  It was a joy doing the touchy feely thing.


Friday, September 27, 2013

Gradient Dip Dyeing a Sock Blank

slisen.blogspot.com
(Click on photos to enlarge)


I just love gradient sock yarns but there aren’t too many retail gradient yarns available.  And besides, dyeing is fun!  So…here’s my first attempt at dip dyeing a gradient sock blank.  And I’m quite pleased with the results, although I miscalculated my color placement a bit.  But as I knit the sock, I pulled out stretches of yarn in appropriate places to arrive at my destination.  The skein of yarn I started with was 4 oz instead of 3.5 oz of most sock yarns.  So here's what I did.
I first started by knitting my yarn into a double stranded blank, with a few rows of waste yarn at both ends.  The waste yarn will make it easier to unravel later and I didn’t want a permanent cast on or bind off edge to prevent the dye from saturating all the stitches.  I used my postal scale as I wound the cakes to get 2 cakes of equal weight.  I knit my blank by casting on 30 stitches and knit 260 rows at T9 on my KX-350 midgauge knitting machine.  I purposely knit my blank narrower than the normal sock blanks so my colors would transition better without creating definitive lines when I knit the sock.

I prepared my blank by soaking in room temperature water with a couple squirts of hand dishwashing soap.  I laid the blank on top of the water and let it ‘sink’ on its own so air bubbles wouldn’t be trapped in the yarn and cause a resistance which would prevent the dye from saturating.  I let it soak for about 30 minutes, then sozzled it around to ‘wash’ the yarn.  Then I rinsed it and soaked again for atleast another 30 minutes while I was preparing the dye mix and work space.

The rest of the steps are pretty much trial and error but worked just fine with a bit of refinement needed for the next batch.

The acid dye that I used calls for 2 tsp per 4 oz of yarn but as I worked, I could see that this was way too much dye.  Doing this again, I would start with about half the amount of recommended dye, thinking that I can always add more dye mix if needed.  

I devised my own DIY rack and frame with a couple pieces of Styrofoam insulation left over from one of our construction projects and used long metal knitting needles to make an adjustable rack.  I placed the yarn blank over the knitting needles and into the dye pot to determine placement of the top needle.  I wanted a couple of inches of the blank to be submerged into the dye pot.  So I poked the first knitting needle thru both pieces of Styrofoam to hold the blank where I wanted to start.  Then I spaced another knitting needle about an inch lower than the first, placed another needle an inch lower, etc until the last needle was resting on top of the dye pot.

I turned my hot plate on to medium high and let the water warm up.  I then added about 2” of warm water to the pot and added the prepared dye mix along with 2T of white vinegar (or citric acid).  Use caution on adding the vinegar at the beginning of the process because some dyes will break color if the acid is added too early.   I wanted my gradient to move from dark at the cuff, toe and heel with lighter portions in between.  Leave it to me, huh?  So I folded the blank in about half, which would be the heel area and hung it on the top knitting needle with both ends and the middle heel area about 2” into the dye bath.

Let that set for about 5 min, give or take, then I pulled out the top knitting needle so the whole blank would drop another inch into the dye bath.  From here, the trial and error really begins.  I placed a plastic dish in front of my dye pot so I could lift the whole rack and Styrofoam frame to see how things were going on the blank and to add water.  After this, I lifted the rack and yarn out of the pot and added a couple inches of water each time I pulled out a knitting needle to lower the blank into the pot another inch.  I let each section sit for about 5 minutes, checked it for desired color before I lowered it again.   Be sure to stir the dye mix each time water is added and before repositioning the blank again.  

When done, the dye mix was a couple of inches from the top of the pot when I pulled out the last needle and let the last portion drop into the dye mix.   I didn’t leave the last portion in the dye mix very long because I wanted it just tinted a bit.  Use your judgment on when to lower the blank or to add water as it will depend on how much saturation you want and how you want your gradient to look.  I used way too much dye this time around so I found it necessary to remove some of the dye mix with a quart jar and discard it and just added more water until I got the nice shaded gradient effect I wanted.

Because the water temperature never got hot enough for 30 minutes to set the dye, I lifted the rack and blank from the dye pot when I was satisfied with the results and squeezed out as much water as I could.  Then I wrapped the blank in plastic wrap and steamed it for 30 minutes after the water came up to boiling.  Cool, rinse, wash with Synthrapol or hand dish soap and rinse til clear.  Voila!  I now have a nice gradient sock blank.


This method of dip dyeing will not result in a solid color because the yarn isn’t in the dye bath long enough to saturate through all the nooks and crannies of the yarn stitches but is lovely none the less.  I would suggest painting instead of dipping if you want more solid colors.


Tuesday, August 13, 2013

Tie Dyed T-shirts

slisen.blogspot.com
(Click on photos to enlarge)


Guess I missed out on the tie dye craze a few decades ago, so our granddaughters roped me in now.   When one of the girls suggested we have a girls’ bonding day to tie dye, I had no idea how to tie dye, what dyes to use or the array of design possibilities.  So being the type of person I am, I started researching tie dyeing so I would be prepared and not feel like a total dummy.  And there’s no better place to start than YouTube.  After watching several videos, I soon learned the basics, tying techniques for the different designs and also that there’s no wrong way to tie dye.  The possibilities are endless.

So off I go to buy shirts and dyes.  Walmart, the only department store in our town is where I found tie dye kits by Tulip.  The kits are prepackaged with dyes and bottles to mix with water, rubber bands, gloves and instructions.  Tulip dyes are advertised as being organic, so I would assume safer for people and safer for the environment.  What more could I ask for?  I also purchased the shirts at Walmart.  The dyes in the kits are fiber reactive so 100% cotton fabric is recommended.  Any fiber reactive dyes can be used, just be sure to follow the manufacturer’s instructions for their use.

Our first tie dye day arrived a couple weeks ago and we just had a blast. Earlier in the morning, I prewashed the shirts to rid them of the sizing in the fabric and applied the dyes while they were still damp.  I laid a plastic painter’s drop cloth over my counter for us to work on, laid our shirts on a couple of paper towels and we began our designs.  They all turned out really great. 


One thing I noticed is that most of the videos I watched and the instructions that came with the dye kits fail to emphasize that the shirts need to be turned over to apply color to the back side also.  One of the girls used different colors on the backside than on the front and came up with a gorgeous spiral shirt.

Fabric dyed with fiber reactive dyes need to set at room temperature to set the colors properly so the hardest part was waiting til the next day to see the results of our creations.  The Tulip instructions say to let set for 6-8 hours before rinsing but recommend up to 24 hours for more vibrant colors.  The rinsing and washing was pretty exciting.  However, after the excess dye is washed out, the colors aren’t near as vibrant as they are when wet.  I must stress to rinse in a sink until the water runs pretty much clear, do NOT wash in the washer until most of the excess dye has been previously rinsed out.  There is a lot of excess dye that doesn't get absorbed into the fabric and if washed before rinsing, a lot of the excess dye will be surging around in the washing machine, to get absorbed in places you don't want it to be.

We had so much fun and wanted more shirts so we planned another tie dye day when all three girls could get together.  On Sat, the 4 of us dyed 3 more shirts each.  Had another fun day, but not without incident….a bottle of dye got knocked off and onto the floor.  But it wiped up with wet paper towels without staining and all was well.  After our dyeing, there were a couple dribbles on the countertop but they cleaned right up by rubbing them with a wet paper towel and a shake of baking soda as a cleanser.  I don’t know how the dye would clean up after it dried but the dye on my fingers has already washed/worn off.  So all is well on that front too.

Enjoy the pictures.

This configuration makes the bulls eye pattern.  Decide where you want the bulls eye located, pinch both layers of fabric and grab it with your fingers.  Hold it up in the air and straighten the fabric as best as you can, section it off and wrap with rubber bands.  Add dye to each section.  On the thicker sections, make sure you saturate the fabric, squirting more dye into the folds, turn over and repeat the colors on the other side.


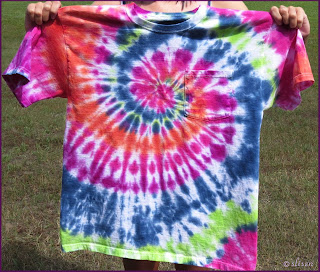
This method makes a spiral design.  Again decide where you want the spiral located on your shirt, grab both layers of fabric and tightly twist it around, making a circle.  Place rubber bands around the shirt as shown and apply dyes to each 'pie' shape.  Again squirt dye into the folds.   Turn over and repeat the colors on the back side.  Use a clean paper towel to prevent unwanted drips applying themselves to the wrong spots.


These are the dyeing results of the girls' shirts on our 2nd get together.  Look interesting, don't they?


These are the shirts from the group on the right hand side.  I think they're all great!
The kitty thinks so too.


These 3 came from the middle group in the picture above.  Pretty awesome.


These are the shirts we did on our 2nd day.  The double spirals are done by folding a bottom corner of the shirt up to the opposite shoulder seam, then twisting the same as for the single spiral.   The top 3 shirts are results of the first group in the photo above.  And the 2 on the right hand side are double spirals.  The one in the middle was dyed with different colors on the back side. 


These are the shirts from our first dyeing day.....just enough to make us want to do more.


P.S.  Here are a couple links from YouTube to help get you started.

Single spiral:  http://www.youtube.com/watch?v=PbjWkiQ5DtI&list=TLkqsBo7zhfZo

Double spiral:  http://www.youtube.com/watch?v=tZGwVMs5lBg

Bullseye:  http://www.youtube.com/watch?v=2nm0q5654AE