 |
| (Click on photos to enlarge) |
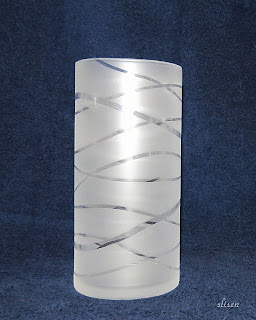
I just ‘discovered’
another fun thing to do. A friend posted
a video from YouTube on FaceBook that shows how to make frosted designs in
glass vases that look for all the world like etched work. Lovely pieces, a relatively cheap craft and
no 2 designs will be the same. Use your
browser’s search engine and search on ‘rubber band vase’. You’ll see some beautiful pieces of work and
also links to videos on YouTube that show you how to do it. This is the very good video that I watched. https://www.youtube.com/watch?v=d8wmHG_NTcs
First off, this is a
list of needed supplies:
A piece of glassware
An assortment of rubber bands
A spray can of ‘frosting’ paint
An assortment of rubber bands
A spray can of ‘frosting’ paint
The gal in the video I
watched used 7” glass cylindrical vases but any shape or size can be used. But unless you can find some really long rubber
and wide bands, I’d stick to around this size.
As rubber bands stretch, they get thinner and you may want some wider
bands.


Wash the glassware in
soap and water, then wrap the rubber bands around the vase in whatever design
you want. Make sure the bands are flat
and not twisted. I chose to do swirly,
mainly cuz that’s what the video showed and I love them. The more rubber bands you use, less frosting
and more glass will be showing. Fewer
rubber bands will result in more frosting and less glass. Get creative.
The video instructed to
clean the outside of the vase with rubbing alcohol and a Q-tip. But I didn’t do that step because I didn’t
know how the paint would interact with the alcohol residue. So I just wiped the open areas with a dry
paper towel to get rid of the fingerprints.

Take your project
outside, turn the vases upside down and spray them with the frosting paint,
following the directions on the can. The
gal in the video used Krylon Frosting but most every spray paint manufacturer
has its own version. I’m using Rust-oleum
Frosted Glass and it worked just fine.
DO NOT overspray. This paint is deceiving
because the frosting effect doesn’t happen til after about 10 minutes so I
really couldn’t tell if I was getting good coverage or not. But trust me, three light coats are better
than one heavy one….or in my case, 3 heavy ones as on my first try. This picture shows what happened when I got
too much paint on. The wet paint pooled
around the rubber bands and I had globs of paint left when I took the rubber
bands off. Grrr.
Let the paint fully dry
for at least a couple hours above 50 deg F and remove the rubber bands and
admire your vase. I’m loving it!
I read the comments
below the video and see that she used water pearls and battery operated submersible
LED lights along with candles in some of her finished vases. How very lovely.
Use your imagination
and use other glassware, bottles, cups, candle holders, etc, and different
colors of spray paint. I can easily see
these in sparkly gold or silver for the holidays or some of the fluorescent
paints to accent a fun mod decor.
A couple words of
caution.…instructions on the paint I used said frosted articles could be gently
hand washed with soap and water but not to put them in the dishwasher. And it also states that the ‘frosting’ can be
removed from glass with lacquer thinner or acetone. Aha, a cure for my disaster vase above….strip
it and redo it.
A DAY LATER:
I stripped the 'mistake' glass with paint thinner and washed it in lots of soap and water, rinsed well and redid it. It turned out as nice as the other one.
A DAY LATER:
I stripped the 'mistake' glass with paint thinner and washed it in lots of soap and water, rinsed well and redid it. It turned out as nice as the other one.


